The New Guinea campaigns also dominated the minds of Australian military planners over succeeding years as they considered issues such as coalition warfare and joint operations. The models for Australian doctrine on amphibious warfare, air-land cooperation and jungle fighting came from the New Guinea experience. The problems of cooperating with a large and powerful ally were highlighted during the New Guinea campaigns and have been central to Australian strategic thinking ever since. Australians might have learnt about war at Gallipoli, but New Guinea was the place where Australians learned about strategy and military operations.
There are numerous popular images of Australia’s New Guinea campaigns. These include the terrible ordeal on the Kokoda Trail, the desperate days at Milne Bay, the swamp and futile attacks at Buna, Gona and Sanananda, the exploits of the Beauforts and Beaufighters over the Bismarck Sea and many others – Wau, Salamaua, Nadzab and Lae, Shaggy Ridge, Sattelberg, Wewak and Bougainville.
But these battles were only the outcome of strategic decisions made in comfort in Melbourne, Canberra, Brisbane and Port Moresby. The real question is not whether the Australians fought valiantly and well, but why the battles were fought, or even whether they needed to be fought at all. My paper examines these decisions and the command framework in which they were made. It explains that the New Guinea campaign must be seen in the context of overall Allied strategy in which Australia had little capacity to make independent decisions. The instrument for exercising Allied strategy was the Commander-in-Chief South-West Pacific Area, General Douglas MacArthur. Initially Australian and Allied strategy was one of merely reacting to the Japanese threat. Then the Allies took the initiative. But eventually Australia had to consider its own strategic interests. How seriously did Australia take this responsibility and what was the longer-term legacy of these decisions?
Introduction
One legacy of the New Guinea campaign was Australia’s acceptance that it had to be involved militarily with the region. We learned that we could not rely completely on other countries to do the fighting. This led eventually (and reluctantly) to the commitment of forces during the Malayan Emergency, and later to Vietnam and to Borneo during Confrontation. The end of the Vietnam War marked the end of the era of forward defence, and it seemed then that we would never again commit forces to the region. But nonetheless, most of the Defence Department’s strategic assessments over the past thirty years have claimed that any threat to Australia must come from or through the archipelago to the north, by which is meant Indonesia and Papua New Guinea. In the 1970s and 1980s Australia hoped to deal with this threat by establishing naval and air forces that could meet and defeat an enemy in the so-called sea air gap. Stability in the region was to be promoted by military engagement, which included joint exercises and training. The government’s 1997 Defence White Paper, however, raised again the possibility of operations in the littoral environment to our north, in which land forces would have an important role. The possibility of sending forces into the region was under discussion in the Defence Department even before the East Timor commitment in September 1999.
Australia has not always focussed its defence effort on the near region. For most of the nineteenth century threats were seen as coming from further afield by naval forces operating against Australia’s southern cities. There was, however, a flurry of concern about New Guinea in the 1880s. In response to a rumour that Germany was to take over New Guinea, in 1883 the Queensland colonial government took possession of eastern New Guinea, mainly for defence reasons. The British government disowned the Queensland government’s action but reached an agreement by which Germany would annex the northern area and Britain would take Papua. As Tom Millar put it: “The territory was seen as important to the defence of Australia, but rather as an inert shield. No military or naval base was established.”[1]
On the outbreak of the First World War, Australia seized German New Guinea to deny it as a base for German raiders. After the war Australia secured a League of Nations mandate over the former German territories. The Australia Prime Minister, Billy Hughes, had demanded possession of these island “ramparts” to keep them from “the hands of an actual or potential enemy”.[2] Australia was not permitted to establish military or naval bases in the mandated territory, but nor could any other power.
After the outbreak of the Second World War, Australia moved slowly to defend New Guinea and by December 1941 Australia had deployed only small garrisons to Rabaul and Port Moresby. In accordance with pre-war plans, small garrisons were also deployed to Ambon and Timor in the Netherlands East Indies. This was recognition that Australia’s defence was bound up with the region and that we had to play a role in it. Of course we had already sent troops to Malaya, but that was part of a British commitment. Australia’s defence policy was equivocal. Australia did not have sufficient forces to reinforce the forward bases but was reluctant to abandon them to the enemy. As a result, the garrisons at Ambon, Timor, Rabaul and New Ireland were overwhelmed and destroyed. Thereafter, for the next year Allied strategic policy with regard to New Guinea was reactive – responding to Japanese initiatives.
Command Structure
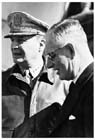
The commanders were vitally important during the New Guinea campaigns so let us briefly look at the command structure. The key figure was General Douglas MacArthur, who became Commander-in-Chief of the South-West Pacific Area in April 1942. MacArthur received his strategic direction through the US Joint Chiefs of Staff and, since he was an Army commander, the direct line of communication was through the US Army Chief of Staff, General George C. Marshall. Admiral Chester Nimitz, commander of the adjoining Pacific Ocean Area at Hawaii, received his strategic direction through Admiral Ernest King, the US Chief of Naval Operations. King saw the Japanese as the main enemy – but only just ahead of MacArthur and the US Army. US military operations in the Pacific suffered because of the intense rivalry between the Army and the Navy, and the US Navy was loath to place forces under MacArthur.
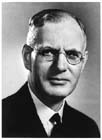
MacArthur’s command was further complicated by his presence in Australia, where he became the principal military adviser to the Australian Prime Minister, John Curtin. Curtin knew nothing about military matters and most of his ministers knew even less – they were suspicious and mistrustful of the Australian military. They thought that MacArthur was a brilliant general – they could not see that he was a brilliant charlatan, adept at public relations and self promotion but actually responsible for military disasters in the Philippines. Perhaps they did not care because MacArthur, by his presence, ensured support from the United States. So MacArthur was given operational control over all of the Australian armed forces within the South-West Pacific Area – which included all of the Australian continent as well as the islands to the north of Australia.
Australia’s military leaders were largely cut out of the decision-making process. Curtin’s most important Australian adviser was a civilian, Frederick Shedden, the Secretary of the Department of Defence, the War Cabinet and the Advisory War Council and member, along with Curtin and MacArthur, of the Prime Minister’s War Conference. Neither Curtin, MacArthur nor Shedden – nor for that matter the senior Australian Army commander, General Sir Thomas Blamey – had ever been to New Guinea.
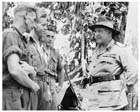
Blamey was MacArthur’s most important commander during the early fighting in New Guinea. Blamey was the Commander-in-Chief of the Australian Military Forces and also became Commander Allied Land Forces. MacArthur was reluctant to place US forces under an Australian commander, even though the Australian Army had some thirteen divisions in Australia and the Americans had two. Instead, MacArthur decided to operate through task forces, but he was directed by Marshall in Washington to appoint Blamey as Commander Allied Land Forces. Blamey was tough and experienced, but if it came to a choice the government would accept MacArthur’s rather than Blamey’s advice.
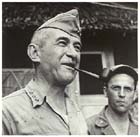
In the first New Guinea campaign, Blamey might have been the most important of MacArthur's commanders, but he was not the most trusted or influential. MacArthur relied heavily on his air commander, Lieutenant General George Kenney, who gave the main role in New Guinea to the US Fifth Air Force, which he also commanded. The Australian air force had a subordinate role.
MacArthur’s naval commander was less important, partly because his navy was much weaker by comparison with his army and air force and partly because of the antipathy between the Navy and the Army. MacArthur’s naval forces were commanded by a succession of US Navy officers, with the RAN operating under American command.
We can see, then, that air and naval operations were largely in American hands, but this was not the case with the land forces. The land operations in New Guinea during 1942 and 1943 were conducted mainly by Australian troops under the Commander New Guinea Force based in Port Moresby. In August 1942 the Commander New Guinea Force was Lieutenant General Sydney Rowell, but in late September 1942 Blamey went to New Guinea and dismissed Rowell. Lieutenant General Edmund Herring was then nominally Commander New Guinea Force. When Blamey returned to Australia in January 1943 Herring remained and was eventually relieved by Lieutenant General Sir Iven Mackay. Eventually, MacArthur cut Blamey and the Commander New Guinea Force out of the command chain. Let us now look at strategy
The Papuan Campaign
The Papuan campaign, between July 1942 and January 1943, was conducted primarily as a reaction to Japanese initiatives. MacArthur later claimed that the Australians had a “largely defeatist conception” of defending their country from the Brisbane Line, but that when he arrived he “immediately changed to a plan to defend Australia in New Guinea”.[3] This claim distorts the truth.
When MacArthur took command he largely endorsed the deployment of Australian forces in the defence of Australia. Thus, during the battle of the Coral Sea in early May 1942 the garrison of New Guinea was not materially stronger than the one that had been established there early in January 1942. Neither MacArthur nor Blamey heeded the intelligence from broken Japanese codes that the Japanese were going to land at Buna.
Following the US Navy’s victory at Midway in early June 1942, MacArthur started planning to capture the main Japanese stronghold at Rabaul. Eventually, on 2 July 1942, the Joint Chiefs directed that South Pacific Area forces would seize the southern Solomon Islands, including Guadalcanal. MacArthur’s forces would seize Lae and Salamaua on the north coast of New Guinea, and then together the forces would take Rabaul.[4] As the first step MacArthur decided to establish an airfield at Milne Bay at the south-eastern tip of Papua, followed by further airfields near Buna on the north coast of Papua.
The Japanese beat the Allies to the punch and on 21 July landed at Buna, heading for Kokoda. US Marines from the South Pacific Area landed at Guadalcanal on 7 August, but the Japanese reacted with vigour. Soon intense battles were raging in Papua and on and around Guadalcanal. The Allies’ optimistic plans for an offensive to seize Rabaul dissolved.
The Papuan campaign began with the Japanese advance over the Kokoda Trail. The Japanese were repulsed at Milne Bay, driven back along the Kokoda Trail, and eventually in January 1943 defeated in bitter battles at Buna, Gona and Sanananda. These were some of the most important battles ever fought by the Australian Army, but in many ways they were incidental to MacArthur’s strategy. They were fought as a reaction to a Japanese thrust; but once they were over, the territory seized became the springboard for MacArthur to continue the offensive he had planned over six months earlier. MacArthur's desire for a quick victory at Buna and Sanananda related mainly to his desire to win his campaign before the US Navy won its campaign at Guadalcanal. As a result, good men died unnecessarily.
Even if the Allies had not been surprised by the Japanese offensive in July–August 1942, they would never have been able to mount the offensive planned by MacArthur. At that stage they lacked the ships, planes and trained troops. By January 1943 the ships and planes had started to arrive. However, the troops that had fought in New Guinea were exhausted and needed to be retrained. Meanwhile, the 3rd Australian Division took the fight to the Japanese between Wau and Salamaua. US and Australian aircraft began an extensive campaign to win air superiority and had a major victory against a Japanese convoy in the battle of the Bismarck Sea in March 1943.
Changing the command structure
In preparation for the coming offensives, MacArthur now began to restructure the command arrangements. From the beginning he had planned to conduct his operations with task forces. During the Papuan campaign he had arranged to have Blamey ordered to New Guinea to take command there, thereby making Blamey the commander of New Guinea Force. But MacArthur was not going to allow Blamey to resume his authority as Commander Allied Land Forces. He asked Marshall to send Lieutenant General Walter Krueger from America to command the US Sixth Army. There were not yet enough troops to form a US army in Australia, so MacArthur formed Alamo Force, also commanded by Krueger, to keep control of Sixth Army units away from Blamey.
The New Guinea Offensives
Although MacArthur’s campaign for the advance from New Guinea to the Philippines was based on a maritime strategy, he had only a relatively small navy. Instead, his main striking force was his air force, based on jungle airstrips rather than on aircraft-carriers. The army had to seize and hold the areas for the airstrips and for the naval anchorages and bases, while the navy had to lift the forces forward to each new position. We now know that in pursuing this strategy MacArthur was assisted by signals intelligence in selecting areas that were held lightly by the enemy – although at times he ignored this intelligence.
After a major strategy conference in Washington, on 28 March 1943 the Joint Chiefs issued MacArthur with a directive, which listed the following tasks for Operation Cartwheel:
1. The establishment of airfields on Kiriwina and Woodlark.
2. The seizure of Lae, Salamaua, Finschhafen, Madang and western New Britain (Cape Gloucester)
3. The seizure of the Solomon Islands to include the southern portion of Bougainville.[5]
The third task was to be given to the forces of the South Pacific Area operating under MacArthur’s strategic direction.
The Australian government was not formally consulted about the decision made by the Joint Chiefs of Staff in mid-1942 to seize Rabaul, or the revised decision of March 1943 to advance to Rabaul. Both decisions were urged by MacArthur who had his own agenda of honouring his “I shall return” vow to the Philippines – the scene of his earlier disasters. Fortunately, at this stage US strategy (or more strictly MacArthur’s strategy) was in harmony with the Australian government’s view that as many resources a possible should be devoted firstly, to securing Australia, and secondly, to driving the Japanese away so that they could no longer pose a threat.
But the formation of Alamo Force and the attempts to marginalise Blamey should have alerted the Australian government that there could be no guarantee that American strategy would necessarily be in Australia’s national interests. Already by mid-1943 there were differences between MacArthur and the Australian government over the allocation of Australian manpower. The outcome would determine how many divisions the Australians could deploy on operations.
MacArthur’s approach was revealed in Operation Cartwheel. MacArthur divided his force into four tasks forces, not counting the South Pacific Area forces. The first task force was New Guinea Force, under General Blamey. This consisted mainly of Australian Army units, but included some Americans, and had the task of seizing Lae, Salamaua and the Huon Peninsula up to Madang. The second task force was New Britain Force under General Krueger. This was an American force based on the Sixth Army, and had to seize the islands of Kiriwina and Woodlark and western New Britain. The third task force was the Allied Naval Forces, and the fourth task force was the Allied Air Forces.
In planning these operations, MacArthur had his headquarters in Brisbane with the headquarters of the Naval, Land and Air commanders – Carpender, Blamey and Kenney. The headquarters of New Guinea Force was in Port Moresby. Blamey was also Commander New Guinea Force but, until he arrived, Lieutenant General Herring filled this position.
The first major amphibious landing was that conducted by New Britain Force on the islands of Woodlark and Kiriwina in June. General Krueger commanded the operation. There were considerable problems in the execution of that operation, but because there were no Japanese on the islands, the mistakes did not matter much and it was a good learning experience.
The next major operation was the 7th Australian Division’s air-landing at Nadzab and the 9th Division’s amphibious landing at Lae in early September. While Herring, in Port Moresby, did his best to co-ordinate this planning, all the details could not be pulled together properly until firstly, Blamey arrived in Port Moresby on 20 August as Commander New Guinea Force, and then when MacArthur himself arrived on 26 August to take command of the whole operation.
MacArthur refused to appoint joint task force commanders for his operations. This meant that while Blamey, as Commander New Guinea Force, had responsibility to land his forces at Lae and Nadzab and secure the Huon Peninsula–Markam Valley area up to Madang, he had no control over the naval or air forces supporting him. With MacArthur in command, and with good co-operation between the three services, the Lae and Nadzab operations worked smoothly. However, the command shortcomings became apparent in the Finschhafen operation which took place soon after.
Although MacArthur commanded the campaign, Blamey had prime responsibility for the Lae-Finschhafen operation. It was an impressive campaign, which involved troops from five Australian divisions, an airdrop by an American parachute regiment, several amphibious landings and an air-supported advance up the Markham and into the Ramu Valleys. Blamey played an important role in devising the plan by which the 3rd Division refrained from taking Salamaua until after the Lae landing, thus drawing Japanese forces from Lae into Salamaua. Once the Australians landed near Lae the forces at Salamaua were cut off.
The American advance to the Philippines
With the capture of Madang in April 1944, most of the Australian Army units began to withdraw to Australia for rest and retraining and the bulk of the fighting was taken over by the Americans. By this time there had been a fundamental change in MacArthur’s strategy. MacArthur’s directive from the Joint Chiefs had required him to capture Rabaul as part of a step-by-step approach towards the Philippines. In August 1943, however, the Joint Chiefs ordered MacArthur to neutralise Rabaul and advance along the north coast of New Guinea. In February 1944 MacArthur’s forces took Los Negros in the Admiralties. Then, in a series of remarkable forward leaps, his forces landed at Hollandia in April, Biak in May, Sansapor in June and Morotai in September. In October the Americans landed at Leyte in the Philippines. The Australian Army had no role in these operations although elements of the RAN and RAAF took part in several landings.
This changing strategic situation demanded some clear-eyed thinking by Australian policy makers. In a War Cabinet meeting on 1 October 1943, the government concluded that Australia’s military effort should be concentrated in the Pacific and “that it should be on a scale to guarantee her an effective voice in the peace settlement”.[6]
But just what this meant was not clear, as MacArthur decided when and where the Australian forces were to fight and the Australian government still bowed to MacArthur’s wishes. And Blamey had lost his influence. In September 1944 MacArthur destroyed the myth that Blamey had any role as Commander Allied Land Forces when Alamo Force was dissolved and MacArthur’s orders were given directly HQ Sixth Army. Lieutenant General Sir Leslie Morshead, as Commander 1st Australian Corps, was the land task force commander for the Borneo operations in 1945, answering directly to MacArthur’s headquarters.
By 1944 Australia’s strategic policy towards New Guinea and more generally towards operations in the South-West Pacific Area were being driven by the command structure. Curtin was determined to maintain the original command structure and this, by its nature, restricted Australia’s options. The Australian government did not develop a considered and coherent policy towards New Guinea. Once the Japanese threat had been eliminated, was New Guinea a mere stepping stone on the way to the Philippines and eventually Japan? Or should New Guinea be liberated for its own sake?
When, in August 1942, Blamey had appointed Major General Basil Morris as Commander of the Australian New Guinea Administrative Unit (ANGAU), his main purpose had been to harness the local human and materiel resources to support his operations. But as the operations moved north, ANGAU became more involved in the civil administration of the territory. Later, as plans were developed to recapture North Borneo, civil affairs teams were formed to administer the liberated territories. This raised suspicions among some British officials that Australia was hoping to take over these territories. And these suspicions were fuelled by suggestions from the Australian Minister for External Affairs, Dr Evatt, that the future defence of Australia might depend on taking control of certain islands of the archipelago. But there was no cooperation between Evatt and Blamey over this issue. Blamey, Curtin, Evatt and the Minister for External Territories, Eddie Ward, at times discussed the need for Australia to assume a wider and more powerful presence in the Pacific after the war, but they failed to develop any coherent policy.
Blamey failed as a strategist in mid- and late-1944, not because his proposals for changing Australian and Allied strategy were wrong – even though some of his proposals were unrealistic - but because he failed to engage the government over the key issues. In his defence, the government was in no mood to listen.
Nonetheless, either by design or by accident, the decisions about the employment of Australian forces in 1943–1944 marked a turning point in Australian strategic policy. For the first time Australian troops were deployed primarily for political purposes that were not related directly either to winning the war or defending Australia. It was a policy that has continued ever since.
The Borneo Operations
The operations in Borneo in 1945 – Tarakan, Brunei and Balikpapan – were conducted for MacArthur’s strategic purposes. His reasons included finding work for the 1st Australian Corps, liberating former Dutch and British territories and liberating Allied prisoners of war. Essentially the Australian government endorsed the operations as the price for being part of the allied command structure. We see here a forerunner of Australia’s postwar alliance with the United States.
With hindsight we now know that MacArthur was not honest with the Australian government. Blamey and his senior commanders doubted whether there was any strategic purpose for the 7th Australian Division’s landing at Balikpapan in July 1945. In response, MacArthur told the Acting Australian Prime Minister, Ben Chifley, that to cancel the operation “would disorganise completely not only the immediate campaign but also the strategic plan of the Joint Chiefs of Staff”.[7] The Australian government approved the operation. The Australians did not know that MacArthur had told the Joint Chiefs that the Balikpapan operation was necessary because not to carry it out would “produce grave repercussions with the Australian government and people.”[8]
The Final New Guinea Campaigns
By contrast, the Australian offensives at Aitape and on Bougainville in the last year of the war were not directly ordered by MacArthur but by Blamey. In hindsight the offensives had no bearing on the outcome of the war, and even at the time many soldiers resented the loss of lives in the unnecessary battles. MacArthur told Curtin that “if he was doing the job himself, he wouldn’t jeopardise a single Australian life in an offensive in these back areas”.[9] Yet his American forces undertook similar operations in the southern Philippine islands.
In May 1945 Blamey explained the reasons for these offensives to the War Cabinet which gave them retrospective endorsement. Blamey's case was persuasive. He was not to know that the war would end in August and the best way to withdraw troops from these “back areas” was to eliminate the Japanese forces there. This would not only to meet demands for demobilisation, but also make troops available for the invasion of the main island of Japan in March 1946. As Japanese forces were occupying Australian mandated territories, Blamey argued: “Were we to wait until Japan was finally crushed, it could be said that the Americans, who had previously liberated the Philippines, were responsible for the final liberation of the natives in Australian territories, with the inevitable result that our prestige abroad and in the eyes of the natives would suffer much harm”.[10]
Furthermore, some Americans had spoken of securing economic advantages in the areas liberated by their own troops. Blamey said that the Australian external territories were “not only undeveloped areas”, they were “also Australia’s defence rampart”.[11] Finally, Curtin and some ministers felt that “a continued role would strengthen their position in the coming peace negotiations”.[12] There was, therefore, a mix of political and military reasons for the operations. The problem was that the government was not involved closely in the decision to initiate them.
Conclusion
The Pacific War saw Australia send large numbers of military forces into the nearby region. Forces were deployed to Malaya, the Netherlands East Indies, New Guinea and, to a lesser extent, the Philippines, while Australian naval and air forces operated across the whole region. The largest numbers of forces were deployed to New Guinea and they were there for a much longer period of time. This trend continued in the postwar period with deployments to Malaya, Thailand, South Vietnam, Singapore and Borneo. The commitment to Malaysia has continued. More recently, troops have been deployed to Cambodia, Bougainville, East Timor and now, to the Solomons. I wonder what our Asian and Melanesian neighbours think of the strategic policies of this large, thinly-populated Western country to their south that periodically sends troops into their midst.
The strategic environment has changed several times over since the Second World War. The need to deploy forces to New Guinea in the Second World is unchallengeable. In the 1950 and 1960s Australia deployed forces overseas in the context of decolonisation and the Cold War. For a while we were reluctant to send forces away from Australia; more recently, Australia has deployed forces for humanitarian and peacekeeping reasons with United Nations’ endorsement. The key factor behind Australia’s leading role in East Timor, Bougainville and the Solomons has been their close proximity to Australia.
Over the years, successive Australian governments have had to grapple with the fact that the main threat to Australian security has come from or though the archipelago to the north. These threats have been handled in many ways: by deploying forces (usually as part of a coalition force); by cooperation with our neighbours; by establishing alliances; by withdrawing into fortress Australia; by cultivating friendships; by lending a helping hand; and by maintaining surveillance. In all this, Australia has learnt to put its own interests uppermost. But the time when Australia learned its most important lessons about strategy was during the New Guinea campaigns.
Notes
1. T. B. Millar, Australia in Peace and War: External Relations since 1788, Second Edition, Australian National University Press Maxwell Macmillan, Sydney, 1991, p. 265.
2. Dudley McCarthy, South-West Pacific Area First Year: Kokoda to Wau, Australian War Memorial, Canberra, 1959, p. 40.
3. MacArthur's statement of 18 March 1943 is reproduced in Notes of Discussions (by Shedden) with C-in-C SWPA, Brisbane, 25-31 May 1943, National Archives of Australian (NAA), CRS A5954, 2/3.
4. L. Morton, Strategy and Command: The First Two Years, OCMH, Washington, 1962, p. 619.
5. Morton, Strategy and Command, p. 398.
6. Minutes of War Cabinet Meeting, Canberra, 1 October 1943, NAA, CRS A5954, 809/2.
7. Macarthur to Chifley, 20 May 1945, NAA, A5954, 750/2.
8. MacArthur to Marshall, 12 April 1945, US National Archives and Records Administration, RG 218, CCS 383 Pacific Ocean Area (6-10-43) Sec 11.
9. Notes of discussion (by Curtin) with C-in-C SWPA, Canberra, 30 September 1944, NAA, CRS A5954, 3/11.
10. Appreciation on Operations of hte AMF in New Guinea, New Britain and the Solomon Islands, 18 May 1945, Australian War Memorial (AWM), Blamey Papers, 2/23.11
11. Blamey to Minister for Post-War Reconstruction, 12 June 1944, AWM, Blamey Papers, 27.
12. Peter Ryan, "World War II", in P. Ryan, Encyclopaedia of Papua New Guinea, Melbourne University Press, 1972, p. 1222.
AWM 139812
AWM 003870
AWM 016400
AWM 016365
