Huon Peninsula 1943–44 (Photographs)
Module name: Campaign history (All groups perspective)
This page was contributed by Mr Damien Fenton (Australian War Memorial)
| AWM 071964 (Australian War Memorial) Soldiers of "C" Company, Papuan Infantry Battalion (PIB), on parade at their camp near the Song River, New Guinea, March 1944. After its virtual disintegration during the opening battles of 1942 the PIB was reformed with a strength of 20 officers and 421 enlisted men and was reintroduced into combat during the later phases of the Lae-Salamaua campaign. Used as scouts and for long-range patrolling the PIB usually operated as seperate companies rather than as a complete battalion. Having re-established their reputation around Lae the PIB companies were committed to the overland pursuit of the retreating Japanese across the Huon Peninsula. |  |
| AWM 057470 (Australian War Memorial) Australian gunners of the 2/4th Light Anti-Aircraft Regiment and their 40mm Bofors AA gun on Scarlet Beach, 22 September 1943. In the background a giant American LST, disgorging its load of men and equipment, can just be made out. The initial landing had been carried out two days earlier by the Australian 20th Brigade and signified the start of the Allied Huon Peninsula Campaign. | 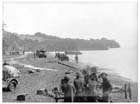 |
| AWM 071959 (Australian War Memorial) The harbour and port installations of Finschhafen, 3 April 1944. Captured by the Australians on 2 October 1943 the port facilities were not restored until the Huon campaign had all but ended. Instead the seaborne lifeline needed to sustain the Australians in the field was maintained by the small landing craft and crews of the American 532nd Engineer Boat and Shore Regiment. | 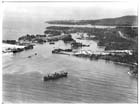 |
| AWM 016126 (Australian War Memorial) A Matilda tank of "C" Squadron, 1st Tank Battalion, moves off an LCM, Launch Jetty, 8 November 1943. Altogether nine of "C" Squadron's tanks were brought forward to support an assault by the Australian 26th Brigade against the Japanese defences around Sattelberg Mountain. For five days (17-21 November) the Australians fought a vicious close-quarters battle against elements of the Japanese 80th Infantry Regiment. Although the Australians made significant gains during this operation the Japanese still held the Sattelberg at its end. | 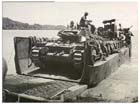 |
| AWM 016104 (Australian War Memorial) An Australian soldier poses with three shells belonging to the captured Japanese Type 41 75mm infantry gun he is sitting on, Katika Track, November 1943. Fighting around the Katika area continued for some two months after the landings at Scarlet Beach culminating in a major counter-attack by the Japanese 79th Infantry Regiment in late October. | 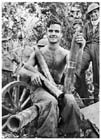 |
| AWM 016129 (Australian War Memorial) An Australian crew and their 2-inch mortar in action during the fighting around the Sattelberg Road, November 1943. For two months the Australians and Japanese were locked in a bitterly fought battle for the Mountain. A succession of local features with names like Fougasse Corner and Steeple Tree Hill became bywords for brutal combat. | 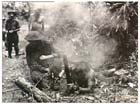 |
| AWM 016226 (Australian War Memorial) Australian soldiers of the 2/48th Battalion and Matilda tanks of the 1st Tank Battalion prepare to resume their advance up the Sattelberg Road after capturing Coconut Ridge, 18 November 1943. Despite this success the attack by the Australian 26th Brigade soon bogged down in the teeth of fierce Japanese resistance. It was another week before the weary men of the 2/48th Battalion reached the summit of Sattelberg Mountain. | 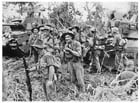 |
| AWM 060621 (Australian War Memorial) One of the hundreds of Japanese killed during the failed counter-attack (16–25 October 1943) by Lieutenant General KATAGIRI Shigeru's 20th Division. KATAGIRI's attack included a small amphibious assault on Scarlet Beach using motorised barges. The Australian and American units at Scarlet Beach easily repelled the Japanese raid but inland the main thrusts of the Japanese offensive were harder to contain. | 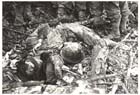 |
| AWM 01676 (Australian War Memorial) Australian casualties being evacuated by jeep down a muddy Sattelberg track to the 2/3rd Casualty Clearing Station at Simbang, just south of Finschhafen, 19 November 1943. A total of 744 soldiers of the 9th Australian Division were wounded during the Huon campaign. Many more fell victim to malaria and dengue fever. | 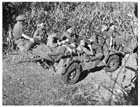 |
| AWM 016294 (Australian War Memorial) Australian troops of the 29th/46th Battalion trudge forward after capturing Gusika, November 1943. The Austalian commander of the 9th Division, Major General Sir George Wootten, was determined to secure his right flank by clearing the Wareo-Gusika ridge before advancing any further up the coast. This operation was not completed until mid-December and only then did the Australian advance towards Sio begin in earnest. | 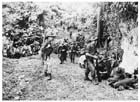 |
| AWM 016562 (Australian War Memorial) Australian military police carry a badly malnourished Japanese prisoner aboard an aircraft at Finschhafen airfield for evacuation to Port Moresby, February 1944. Hundreds of Japanese sick and wounded perished during the 20th Division's retreat towards Sio after the loss of Sattelberg Mountain. Many died attempting to delay the Australian advance through suicidal rearguard actions. In all a mere 38 Japanese prisoners of war were taken by the Australian 9th Division during the entire campaign. | 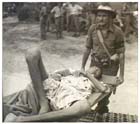 |
| AWM 016424 (Australian War Memorial) American troops of "Task Force Michaelmas" haul their 37mm anti-tank gun up the beach at Saidor, 10 January 1944. Built around the 126th Regimental Combat Team, 32nd Infantry Division, the American task force landed at Saidor on 2 January 1944 with the objective of seizing the nearby airfield. This was accomplished on the first day and thereafter the Americans expanded their perimeter inland and tried to block the Japanese avenues of retreat along the coast. |  |
| AWM 062701 (Australian War Memorial) Troops of the Australian 2/23rd Battalion board the landing barges that will take them further up the coast towards Sio, Kanomi Beach, 5 January 1944. The capture of Sio on 15 January signified the end of the Huon Peninsula Campaign. During its course the Australian 9th Division had suffered a total of 1,028 casualties while its foe, the Japanese 20th Division, was estimated to have suffered some 7,000 casualties. | 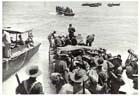 |
Printed on 04/20/2024 06:24:49 AM