| AWM ARTV01011 (Australian War Memorial) Cooperation by air crews was essential for the distribution of leaflets. The dangers of flying low over Japanese positions and the difficulty in assessing the effects of propaganda made pilots initially reluctant. After this kind of poster began to appear in operations rooms, FELO leaflets began to be incorporated into the routine of air operations in the region. |  |
| AWM 079733 (Australian War Memorial) FELO also encouraged Japanese troops to surrender through direct broadcast in Japanese. Private Bavier, an Australian born Japanese interpreter from FELO, is preparing a surrender message to be broadcast to nearby Japanese positions in Bougainville in March 1943. |  |
| AWM 079732 (Australian War Memorial) A FELO officer looks on as a surrender message is broadcast via loudspeaker towards Japanese positions on Smith's Hill in Bougainville in March 1943. |  |
| AWM 019006 (Australian War Memorial) The most common form of leaflet produced by FELO encouraged Japanese troops to cease resistance or surrender. Millions of such leaflets were dropped over Japanese positions in New Guinea. |  |
| AWM 018996 (Australian War Memorial) Distribution most simply comprised bundles of about 300 leaflets dropped down the camera shute of Beaufort bombers. These bundles of surrender leaflets were distributed over Bougainville in August 1945. |  |
| AWM P00001.180 (Australian War Memorial) Bundles of leaflets in the background are ready for dropping from an Australian plane. The string tying the bundles is loosened prior to dropping to allow for the leaflets to spread with the wind. |  |
| AWM RELAWM36178 (Australian War Memorial) Several devices were constructed to fill the need for accurate distribution of leaflets. This leaflet bomb was designed and built by FELO and used over New Ireland in c.1944. It was dropped by a fighter plane and operated by air pressure in the front cup releasing a valve which opened the rear leaflet compartment. |  |
| AWM P02491.049 (Australian War Memorial) The simplest form of distribution consisted of bundles of leaflets being thrown out of low-flying aircraft. As this picture indicates, the accuracy and distribution of leaflets distributed in this manner led to a high wastage rate, leading to more sophisticated methods later in the campaign. |  |
| AWM 079738 (Australian War Memorial) These members of the 4th Australian Field Regiment are seen loading surrender leaflets into 25 pounder shells for firing towards Japanese positions on Pearl Ridge in Bougainville in March 1945. |  |
| AWM 079739 (Australian War Memorial) Distribution by artillery shell was succesfully used in the European theatre, but only used in the Pacific in limited instances. These 25 pounder shells packed with leaflets are being fired towards Japanese positions at Smith's Hill in Bougainville in March 1945. |  |
| AWM P00001.195 (Australian War Memorial) Immediately after the surrender, millions of leaflets were distributed in the region informing Japanese troops that the war had ended and to cease hostilities. The large Japanese characters seen painted on the underside of the wing informed Japanese troops that Japan had surrendered. | 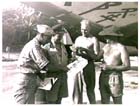 |
| AWM 019003 (Australian War Memorial) Superior Private Takeshita is seen emerging from the jungle in Bougainville after the distribution of leaflets announcing the end of the war. Takeshita was an envoy to arrange for the surrender of the regional Japanese commander, General Kanda. | 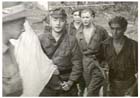 |
FELO leaflets:
 Overview text Longer text Images Readings Documents
